Hello & Happy Wednesday!
So yesterday I said that we did not have any issues with those thunderstorms rolling thru Monday evening...well, last evening we went to Walmart and the town that it is in was pretty much shut down. We had 2 different detours just to get there and oh my Lord, the damage we saw! Roofs blown off buildings, trees down on power lines and corn fields with the corn completely laid over. It reminded me of what we saw in Joplin, Missouri in 2011. Needless to say nothing was open....Walmart included. People from the local fire companies were handing out ice to residents to help keep there food cool. They say power may not be restored until Friday. The National Weather Service was out surveying the damage and i've not yet heard whether it was a tornado or straight line winds.
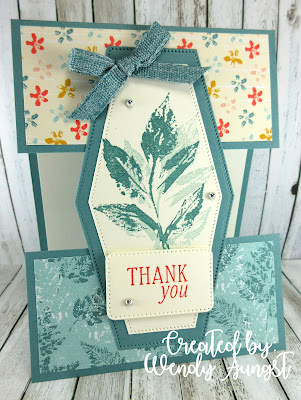
Anyways, today I have a pretty cool card to share with you made using a new to me fun fold.
This is called a Split Card and it's just that....the front is split into two pieces! I will explain....
Card Details:
Stamps: Inked & Tiled
Ink: Lost Lagoon, Calypso Coral, Lost Lagoon, Crushed Curry & Calypso Coral Stampin Write Markers
Cardstock: Lost Lagoon, Very Vanilla, Inked Botanicals DSP
Accessories: Nested Essentials Dies, Rhinestones, Lost Lagoon Ribbon, Glue Dots, Tombow Multipurpose Liquid Glue
Directions:
Start with your cardbase measuring 4 1/4 x 11.
Score @ 5 1/2.
Place card in trimmer and measure 2 inches from that 5 1/2 inch score line and cut off.
The piece that is left your going to cut 2 inches off and that will go at the bottom of the card.
Then you can decide what you will use to hold the bottom piece of cardstock on. I used the long Nested Essentials Dies. I adhered it to the top of my cardbase and once I had that on I placed my other 2 inch piece of cardstock at the bottom of my card and glued the bottom of my Nested Essentials Die down. Make sure to only use a tiny bit of glue on that. I decorated mine as went along. Hope this makes sense.
This is why it is called a Split Front card.
Any questions please feel free to email me at blueyes966@outlook.com
I am still on a roll with making customer Thank You cards.
I just love this style!
*************************************
My thoughts today...


2 comments:
This is such a unique and fun design for a thank-you card and I love your little signature bow at the top! It's a lovely way to express thanks! I feel grateful that our power was only off for about 15 hours after hearing what so many other suffered in that storm line that went through here on Monday. At least the weather is cooler for now which should help the clean-up go a little faster! Enjoy your day!
What a cool card, and of course, these papers are some of my FAVORITES!!!
Post a Comment