Friday, June 30, 2023
Gorgeously Made Tall Notepad
Good Morning & Happy Fri-YAY!
The weekend is here and it's going to get hot & humid again.
With the smoke being so thick in the air my ac has been running and will continue to do so.
Today I have a fun project to share with you again using the Gorgeously Made Bundle.
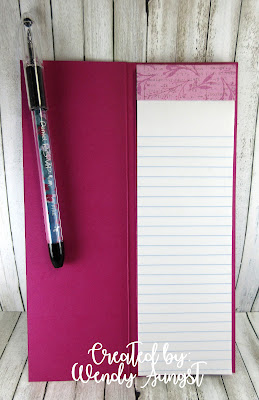
Back when I use to do craft shows I made lots & lots of notepads whether they were composition books, notepads or spiral bound notebooks...I made many! They were my favorites! I was going thru a drawer in my stamp room the other day and found a bunch of notepads that were cut in half at either Staples or Office Max. I decided to get them out and make some fun projects with them. Today I took more of the Masterfully Made DSP and covered a Tall Notepad.
My pictures aren't the best.
I need to check my camera to see if I accidentally changed a setting because I have been known to do that!
I started with a piece of Berry Burst cardstock measuring 5 1/2 x 8 1/4.
Scored on the 5 1/2 side at 2 5/8 & 2 7/8.
Crease the score lines really well.
Next I used Pretty Peacock cardstock measuring 2 1/4 x 8.
My piece of DSP measured 2 x 7 3/4.
I decorated it with the Gorgeously Made Dies in Bubble Bath cardstock.
My sentiment panel was made with the Nested Essential Dies in Berry Burst & Basic White.
The Hello came from the same stamp set. I finished up this notepad with a Bubble Bath bow and some Flat Adhesive Backed Pearls. My pen is a RSVP pen which I enclosed a piece of Masterfully Made DSP into the barrel. It measures 3/4 x 3 1/4.
Project Details:
Stamps: Gorgeously Made
Ink: Berry Burst
Cardstock: Berry Burst, Pretty Peacock, Bubble Bath, Basic White, Masterfully Made DSP
Accessories: Gorgeously Made Dies, Nested Essentials Dies, Bubble Bath Ribbon, Flat Adhesive Backed Pearls, Glue Dots, Dimensionals, Tombow Multipurpose Liquid Glue
That is all for me today!
Stay cool and i'll be back again tomorrow!
*******************************************
My thoughts today...
Thursday, June 29, 2023
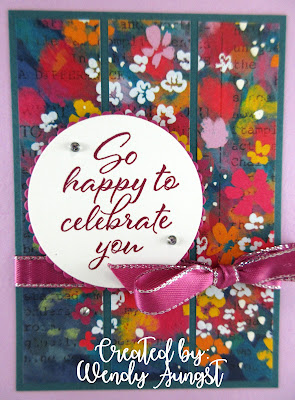
Layering Leaves
Hello & Happy Thursday!
Yesterday the smoke from the wildfires in Canada made it's way back into the air.
At first I wasn't sure if it was hazy or if it was smoke. Turned out it was the smoke. Our sky is so hazy looking that it makes it cloudy. It's really odd. I ended up turning the ac back on since it still felt stuffy out. You know it has to be bad for me to use the ac.
Today I have a busy day.
Yesterday I worked on a few more card kits for future Stamp Day get togethers. I'm so excited to share these cards with the girls in July! We don't have a date set yet but it'll be soon!
The card I am sharing today I made with the Layering Leaves stamp set. It's a new set and it is a Million Dollar Achiever set by Rachel Tessman. It coordinates with the Bough Punch which I did not use on this card.
I started with a Fresh Freesia cardbase then a layer of Pretty Peacock cardstock. The paper is from the Masterfully Made DSP. There are some wild prints & patterns in this pack but boy do I like it! I stamped my sentiment from the Layering Leaves stamp set in Berry Burst ink. I layered that on a Berry Burst scalloped circle. I found in my stash a roll of the Berry Burst Metallic Edged Ribbon so I used some and made a nice bow. Lastly, I added some clear Rhinestones for some sparkle.
Card Details:
Stamps: Layering Leaves (Million Dollar Achiever Set)
Ink: Berry Burst
Cardstock: Fresh Freesia, Pretty Peacock, Berry Burst, Basic White, Masterfully Made DSP
Accessories: Circle Layering Framelits, Berry Burst Metallic Edge Ribbon (retired), Rhinestones, Tombow Multipurpose Liquid Glue
That is all for me today!
Hope you enjoyed today's card!
**************************************
My thoughts today...
Wednesday, June 28, 2023
Gorgeously Made Thank You
Hello & Happy Wednesday!
Today I am sharing another card made with the Gorgeously Made Bundle.
I am always in need of Thank You cards for customers so that is where I was headed with this one. I also used a sketch from the Paper Players that my friend, LeAnne shared earlier this week. Here is the sketch...
Card Details:
Stamps: Gorgeously Made
Ink: Fresh Freesia, Pretty Peacock
Cardstock: Berry Burst, Pretty Peacock, Basic White, Masterfully Made DSP
Accessories: Decorative Circle Punch, Stylish Shapes Dies, Adhesive Backed Sequins Trio, Berry Burst Metallic Trimmed Ribbon (retired), Tombow Multipurpose Liquid Glue
I am loving this bundle and having so much fun with it!
*************************************
My thoughts today...
Tuesday, June 27, 2023
Freshly Made Sketches 591
Hello & Happy Tuesday!
Saturday I came across my friend's blog that shared a card made using the Freshly Made Sketches layout and I had to give it a whirl! Thanks, Carol!
Here is the sketch...
Card Details:
Stamps: Gorgeously Made
Ink: Berry Burst
Cardstock: Berry Burst, Pretty Peacock, Bubble Bath, Masterfully Made DSP
Accessories: Gorgeously Made Dies, Adhesive Backed Sequins Trio, Dimensionals, Tombow Multipurpose Liquid Glue
This is a new bundle of stamps, dies & paper which was on my Wish List since the new catty came out. The DSP is pretty busy but I love the colors in it.
I'm pretty sure I missed the deadline on getting my card uploaded to the FMS page.
It was still fun and pretty easy to create since I have a template in my stash for this design.
I also wanted to share that picture of Miss Bailee from her day at Doggy Day Spa.
She will be turning 12 in a few months and is just the sweetest little dog, ever!
*******************************************
My thoughts today...
Monday, June 26, 2023
For the New Two
Good Morning & Happy Monday!
I hope you had a wonderful weekend!
Today I am sharing a wedding card that I made a few weeks ago when Audrey requested one. I made this card at the same time while I had my wedding stamps out.
Card Details:
Stamps: For the New Two (retired)
Ink: Mossy Meadow
Cardstock: Thick Very Vanilla, Very Vanilla, Mossy Meadow, Petal Promenade DSP (retired)
Accessories: Oval Layering Framelits (retired), Gold/Vanilla Satin Ribbon, Festive Pearls, Glue Dots, Tombow Multipurpose Liquid Glue
That DSP is just perfect alone for a wedding card.
The colors and the flowers are soft and beautiful.
********************************************
My thoughts today...
Sunday, June 25, 2023
Earthen Textures
Hello & Happy Sunday, Everyone!
I hope your having a nice weekend!
Yesterday Miss Bailee got a bath, haircut and her nails done and came home with a cute little scarf on that has stars on and some are glittery. She looked adorable! I will try to get a picture of her today and share tomorrow. We had rain yesterday morning then again around supper time. We are still listed in a drought so I am happy to have the rain. On last evenings walk with Miss Bailee we walked down to check on the garden. The plants look great since they've had rain. Hopefully now things are starting to look up!
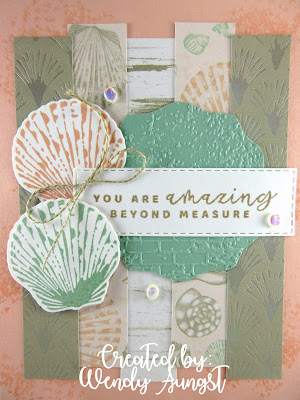
So today I have a cool card to share with you that I made on Friday using the Earthen Textures Bundle. This set was the very first thing on my order in May and this is my 1st card made with it...
I love this suite of products! It always takes me awhile to warm up to new stuff and get the hang of the dies that come with it. While I haven't used many of the dies on this card from the set I can see there are some that don't go with the stamps. I will be playing more with it this coming week and hope to have more idea's for you soon.
Card Details:
Stamps: Earthen Textures
Ink: Pretty Peacock, Moody Mauve, Pebbled Path
Cardstock: Pretty Peacock, Pecan Pie, Pebbled Path, Basic White, Earthen Elegance DSP
Accessories: Earthen Textures Dies, Radiating Stitched Dies, Tailor Made Tags Dies, Exposed Brick 3D EF, Moody Mauve Ribbon, Linen Thread, Pebbled Path In Color Dots, Dimensionals, Tombow Multipurpose Liquid Glue
The colors in the DSP are a nice variety and could be used for masculine cards which is why I purchased this suite. Audrey likes the masculine cards that are not related to any animals of hunting/fishing. Speaking of Audrey, she left me a message on Friday morning for some cards. Most of them I already have completed and on my card rack. The rest I will pick at this week.
That is all for me today!
It's already hot & very humid outside so I hope to play alittle at my stamp table and continue my Chesapeake Shores binge watching! I'm up to the 2nd episode of Season 5. Also on the Hallmark Movies & Mysteries Channel they have Merry Christmas week which I watched a bit of yesterday! I love my holiday movies...even if I have seen them a million times!
************************************
My thoughts today...
~Wendy
Saturday, June 24, 2023
Shortcut Card Sketch #2
Hello & Happy Saturday!
Miss Bailee is off to Doggy Day Spa this morning....she needs the works!
The guys are getting haircuts today, too!
After that my day is open!
Yesterday I watched my usual Friday Facebook Live and played along afterwards using the Shortcut Card Sketch #2.
Here is the sketch:
I printed each of sketches off to use again when I am in a ditch with designing. I keep them in a page protector and then in a big binder.
And here is my card made with the sketch...
Card Details:
Stamps: Season of Chic
Ink: Petal Pink, Mint Macaron (retired), Crumb Cake
Cardstock: Petal Pink, Mint Macaron (retired), Basic White, By The Bay Specialty DSP (retired)
Accessories: Decorative Circle Punch, Chic Dies, Stitched Rectangle Framelits (retired), Exposed Brick 3D EF, Linen Thread, Flat Adhesive Backed Pearls, Glue Dots, Dimensionals, Tombow Multipurpose Liquid Glue
I am pleased with how this turned out and the only thing popped up is my Mint Macaron shell. Hope you like it, too!
********************************
My thoughts today...
Friday, June 23, 2023
July 4th Little Debbies
Hello & Happy Fri-YAY!
It is another rainy morning here in south central PA but that's fine with me....my garden & flowers so desperately need it! We had a misty type of rain most of the day yesterday which is perfect for the garden. I seen rain for the next week so let's hope this makes up for the lack of water!
Today I am sharing another sweet treat that I created using the Little Debbie Nutty Buddy Bars. I found these at the grocery store recently and since my family loves them I created a little box for them. This is what the box looks like if you are looking for them...
Since I created these to fit the Nutty Bars I wanted to share the measurements but I can't find them. I wrote them down as I was making them. If I find them I will make sure to post them. I hope I did not accidentally throw them away but I will look first thing when I get to my stamp table today.
ETA: I found the directions!
Cardstock measuring 5 x 5 3/8
With the 5 3/8 side at the top of your paper trimmer or Score Board score @
1/2, 1 5/8, 2 1/8, 3 1/4
Use the bone folder to get nice creases. The 1/2 panel is where you add the adhesive and attach to back of box.
Decorate & have fun!
I placed my Little Debbie Nutty Buddies inside before I adhered it to the back. They fit snuggly in this pouch.
If you make any of these please share them with me in the comments section.
I'd love to see them!
Project Details:
Stamps: God Bless America (retired), Papertreyink (retired sentiment)
Ink: Blueberry Bushel & Real Red Stampin Write Markers, Real Red
Cardstock: Blueberry Bushel, Basic White, Glorious Gingham DSP
Accessories: Stylish Shapes Dies, Nested Essential Dies, Stitched Stars Dies (retired), Rhinestones, Dimensionals, Tombow Multipurpose Liquid Glue
The sweet treat just fits snug in these and slide out either end.
I wish Stampin Up! would give us another fun July 4th/Patriotic stamp set. It has been a few years since we've had one.
********************************************
My thoughts today...
Labels:
Candy Treats,
God Bless America,
Little Debbie,
Memorial Day/July 4th,
Nested Essentials Dies,
PaperTreyInk,
Stampin Up,
Stampin Write Markers,
Stitched Stars Dies,
Stylish Shapes Dies
Thursday, June 22, 2023
July 4th Candy Bars
Good Morning from a rainy PA!
Happy Thursday, Everyone!
We so desperately need the rain and yesterday it started around noontime and this morning it is still raining! YAY! The ground has got so dry that the dirt is cracking which is odd to see here. We've had a snowless winter (which I am not complaining) but snowfall is critical to the water levels. We are in a moderate drought and recently the county has asked people to start conserving water. This year I did not plant the amount of flowers I normally plant so I don't have as much to water. Because of the lack of heat & humidity so far this season my flowers are not looking all the greatest either. Hopefully the summer weather will soon kick in and perk my flowers up!
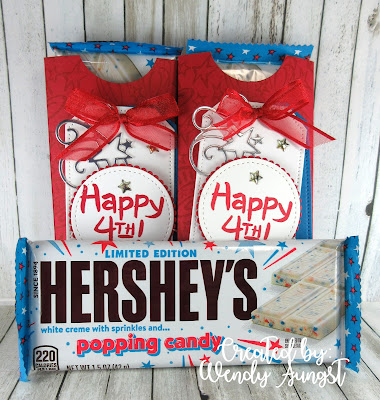
So today I have another sweet treat to share with you. The July 4th holiday is less that 2 weeks away and I do like to have some treats on hand. I know my elderly neighbors love treats! Recently I found the Hershey's Candy Bars at my local Giant grocery store and I purchased a pack. These are a white chocolate with sprinkles & pop rocks in them. Something different. I have not tried them so i'm not sure if they are good or not. I loved that the wrapper is was red, white & blue so I thought i'd give them a try!
For these I did not make my usual candy bar wrappers but just put a belly band around the middle of them. I wanted the decorated ends of the wrappers to be seen. I used a retired stamp set and a coordinating wheel that I unmounted from the wheel and added cushion to. It is now a very long stamp that I find I reach for more often and use. Do you remember the wheels? I use to have lots of ink cartridges for them but they have dried up over the years so unmounting the rubber was a good thing!
Project Details:
Stamps: Happy Fourth (retired)
Ink: Real Red
Cardstock: Real Red, Basic White, Pacific Point (retired), Silver Foil Paper
Accessories: Stitched Stars Dies (retired), Tailor Made Tags Dies, Stylish Shapes Dies, Circle Layering Framelits (retired), Stars & Stripes Wheel (retired), Silver Metallic Stars (retired), Real Red Sheer Ribbon (retired), Dimensionals, Tombow Multipurpose Liquid Glue
I don't make much in candy treats anymore but I do still enjoy making a few things here & there. I have one more July 4th treat to share with you tomorrow so I hope you will stop back!
*************************************
My thoughts today...
On rainy days I like to craft or sit out on the porch and watch it rain.
It kinda just depends on how warm it is or how crazy the rain is! LOL
Today I will most likely continue my binge watching of Chesapeake Shores. I am getting ready to start Season 4. The last episode in Season 3 made me cry. *sigh*
Let me know your answer in the comments!
Thanks for stopping by & enjoy the rain!
~Wendy
Labels:
Candy Bars,
Candy Treats,
Circle Layering Framelits,
Happy Fourth,
Memorial Day/July 4th,
Stampin Up,
Stars & Stripes Wheel,
Stitched Stars Dies,
Stylish Shapes Dies,
Tailor Made Tags Dies
Wednesday, June 21, 2023
Beautiful Balloons Fun Fold
Hello & Happy Wednesday!
We are starting the day with clouds and possibly some rain this afternoon. We really do need more rain than we got last week. For being the first day of summer today it surely has not felt like it. It's been nice but on the cool side. I am not complaining one bit as I don't have to run to the AC or the heat and it's been comfortable to keep the windows open. In less than 2 weeks is the 4th of July and we've not really had much in heat & humidity so far.
Today I have a super cool fun fold to share with you! I made this style of card many years ago and the other day I came across a card on Pinterest. So I decided to try my hand at making another one. I'm not sure what the name of the fun fold is.
I'm going to call this my 3 Panel Slant Fold. They are so fun to make!
To make this you start with a full 8 1/2 x 11 sheet of cardstock.
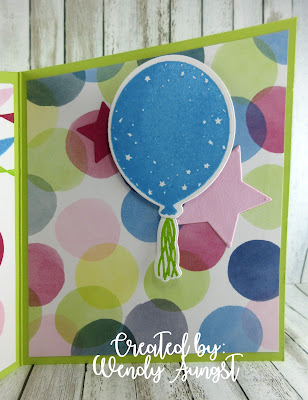
On the 8 1/2 side you want to put a pencil dot at 3 inches on both ends. This is how the slant is created. Then put cardstock in your paper trimmer and cut in half on each dot. Once your cardstock is cut you want to place the flat side against the top of the paper trimmer and score at 3 and again at 6 3/4. This makes the 3 panels on your card. To cut the DSP I measured each space and once my DSP was cut to fit the width I layered my piece onto each section and took a pencil to make dots where I wanted to cut my DSP to fit the slant. I'm not sure there is any other way to cut the slant but using a pencil dot has worked perfectly for mine. Then I started to decorate my panels using the Beautiful Balloons Bundle & some of the Bright & Beautiful DSP. I only popped up my little Lemon Lime Twist Balloon on the front panel as I did not want to bulk up my card so it would mail without extra postage.
My pictures aren't the brightest because it was a cloudy day but you get the idea.
Card Details:
Stamps: Beautiful Balloons
Ink: Lemon Lime Twist, Berry Burst, Azure Afternoon, Bubble Bath
Cardstock: Lemon Lime Twist, Bubble Bath, Basic White, Bright & Beautiful DSP
Accessories: Beautiful Balloons Dies, Stitched Rectangle Framelits (retired), Rhinestones, Lemon Lime Twist Ribbon, Dimensionals, Tombow Multipurpose Liquid Glue
I pulled out my Berry Burst pad from a few years ago from when it was an In Color and it was all wonky. I took a paper towel and wiped it off and it worked for what I needed it to on this card but definitely had to order myself a new pad. Not sure why the red colors of ink pads get wonky after a few years. I've already placed many of them. Today is also FREE Shipping Day at Stampin Up! so make sure you place your orders today!
****************************************
My thoughts today...
Subscribe to:
Posts (Atom)





.png)


